You can pay your foreign currency bills directly on GCFX after you are connected with Xero.
Follow the step-by-step instructions below:
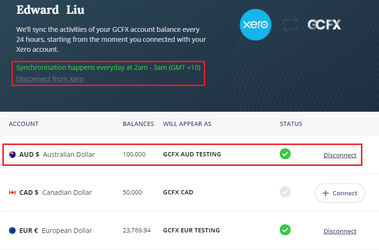
1. Make sure your Xero organization is connected to Xero and the Xero bank account(s) is connected to the corresponding GCFX internal account by viewing the Xero Connection(“Setting” > “Xero Connection”).
2. Once you have bills created in Xero, open GCFX and click on “Xero Bills” to get access to your Xero bills.

3. View all your Xero bill records with the "All Bills" filter (Top-Right Corner).
There will be 3 statues for your Xero Bills:
4. Overdue Bills will have the date highlighted in Red.
5. Select one single bill and click "Settle".
6. You will see the details of the bill and you can select your “You Send” currency. The bill currency will be defaulted as the “Recipient Gets” currency.
7. You can view the exchange rates offered by GCFX (valid for 10s). Currently, we support only full payment for this direct bill payment function, so the bill total amount will be set as the “Recipient Gets” amount automatically. If you wish to arrange a partial payment to your suppliers / merchants, please create multiple bills with separated payment amounts on Xero.
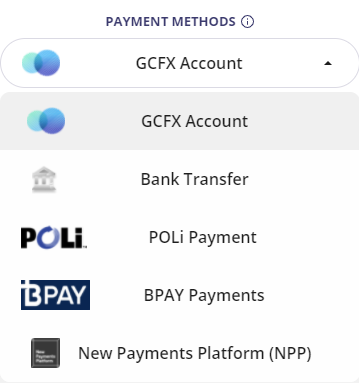
8. Please select your "Payment Method". Note: Only when a GCFX Account is selected (either as the source of funds or the destination of funds), will the FX transaction be uploaded to Xero as Bank Feed.
9. Select your "Purpose of Payment"
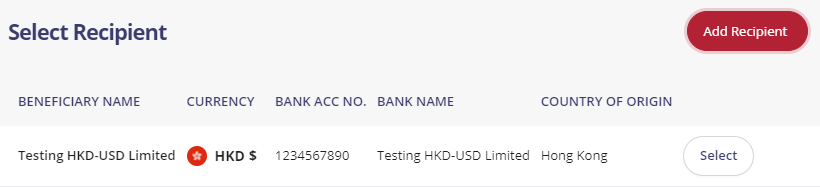
10. Select your registered recipient by clicking on the “Select” button or add a new recipient by clicking on the “Add Recipient” button as the FX deal recipient. The Xero bill’s contact will be automatically pulled as the recipient name.
11. Confirm the exchange rates and the “You Send” amounts.
12. Click “Confirm” and Voilà, all your actions are completed! The FX deal is confirmed and your bill will soon be paid! A FX deal summary will be prompted for your review.
13. You can view your bill payment submission status. After submitting the bill as an FX deal, the GCFX action will be updated to "Submitted".
14. If you has selected a GCFX Account as your payment method, a respective payment will be created in Xero with the GCFX exchange rate to your bill. The selected GCFX account will appear on Xero as your payment’s source of funds.
Once the payment is created on Xero and the bill status is updated to “Paid”, the GCFXbill status will be updated to “PAID”.
Note: If you use other payment methods (other than the GCFX internal account), theXero bill payment transaction will need to be manually inserted in Xero. After the manualcreation, the GCFX Xero bill status will also be synchronized.

15. You can then reconcile on Xero the uploaded FX deal record (Bank Feed) and the bill payment transaction.